Before
Sona Progress: Expanding Foam Comparison and Paper Mache (Etwahl - Part 2)
I couldn't find more bottles of Hilti, so I bought
Great Stuff Big Gap Filler (for gaps greater than 1") from Amazon and
Walmart ($3.77). I thought results would be pretty similiar, but boy
was I wrong. I am not sure if maybe other things may be a factor, but I
found that the consistency looked different and it dried differently.
I liked Hilti a lot better. It came out in large amounts, fluffy and
smooth. Great Stuff came out smaller, and jagged-y, like whipped cream?
Didn't think much about it, and just finished off the bottle and used a
spray bottle to help the expanding process. After it dried, it looked
like this:
Left side is Hilti (I was impatient and carved it already), with spots
of Great Stuff to fill in some holes. Right side is all Great Stuff,
uncarved. But look at the bottom 2 points!!! The right side is lifting
up...what??
 |
| Top half is Great Stuff. Bottom half/middle is Hilti. |
So that this point, I am freaking out. This is my first time working
with expanding foam. I don't know what happened and how to fix it. Do I
just cut off the right tooth and remake it? D: It looks like during
the drying process, Great Stuff foam CONTRACTS and pulls the foam
together. The cardboard was not strong enough to keep it straight. I
had no problems with Hilti on the other side. Silly method, but I used a
rubber band and held the left and right side together and see if that
will pull the 2 sides back together. I worked on other things, and a
couple weeks later, it seemed to be back in place (as best it could).
Here is one half completely carved:

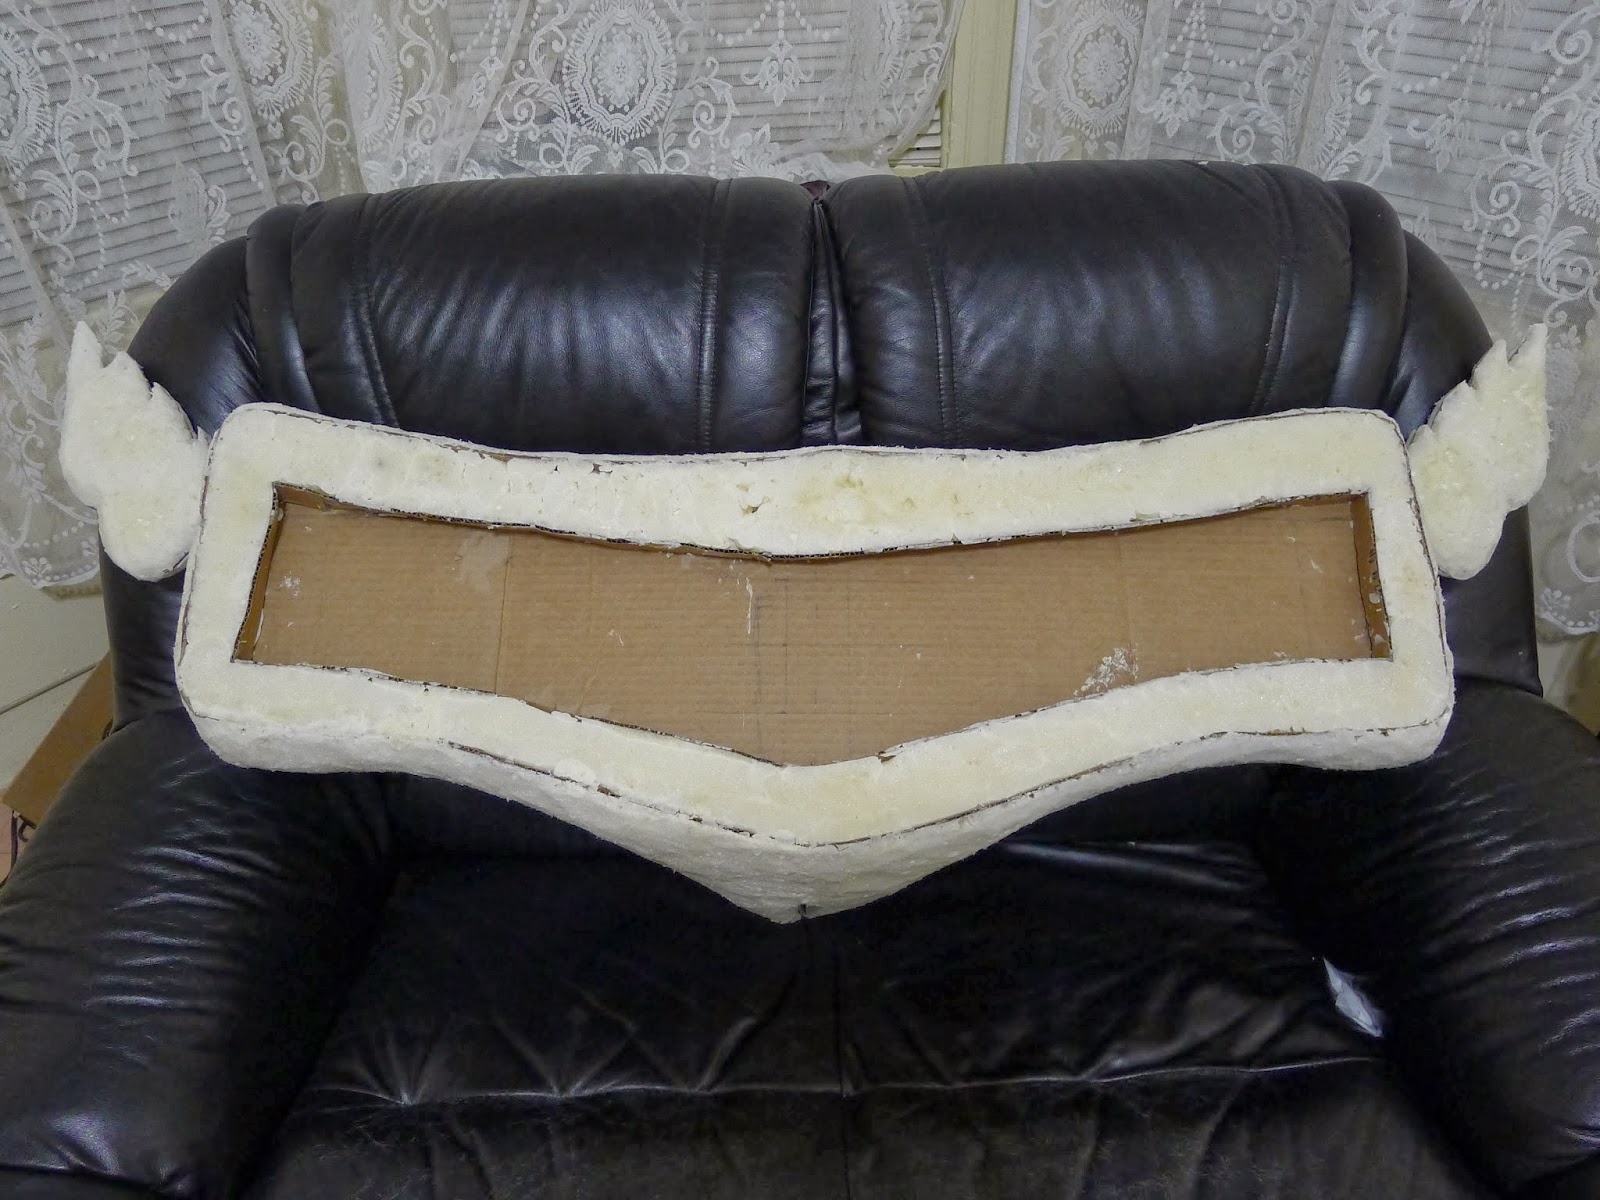
I used a total of 4 bottles of expanding foam to complete the prop.
(the top and bottom middle were not foamed. I wanted to keep the flat
surface, and lighter weight.) Don't be afraid to keep carving! As
close to the cardboard frame as you can. I like my etwahl to have a
more Flat, Smooth, and Clean look. I don't want that bulky and round
look that I've seen so many have when using expanding foam.
 |
| Still carving more! |
 |
| and it is done! |
Here is the finished look. Sadly, I did not make the cardboard template
of the wings large enough and also forgot to make it slant. But I was
too lazy to redo it and just foamed it. Then I regretted not re-doing
it lol -_-" I tried to make it bigger with a little left over foam, and
then also re-modeled it so it would slant upwards to appear bigger
(pictures further down).
In this picture, you can see how the
wings attach to the base. Basically its like a pocket that ou slip it
into. The foam material allows it to stay in snugly and not slip out
To fix it so that it will slant up, I cut a slit where the attachment
and the wing is. I cut out a sliver, applied hot glue there and held it
in place until it dried.
I used craft foam to create the 3 designs that jut out where the glowing strings go.
Step 3: Paper Mache
I didnt take many pictures of the next few steps. But I did record many
videos, which will be up on my Youtube Channel in the future.
I cut strips of newspaper, dipped them in a mixture of Half Water + Half
Glue. Removed excess moisture and then placed them randomly on the
prop. I did about 2 layers. The rounded parts were the hardest to work
with. This helps give a solid base to start putting on Plaster paper
and also not have to make too many layers of plaster paper.
After all that is dry and hardened, you can apply strips of plaster
paper. You can cut larger pieces to have less lines and ridges. I did 2
layers on the front (the most important part!) and just one layer on
parts of the back and underside. I ran out before I could even cover
the bottom side, but its not necessary.
For the 2nd layer, I used really large pieces so there would be minimal
lines. For the wings, I skipped the newspaper and went straight to
plaster becuase there was just too many rounded corners that it would
not adhere well.
Finished plastering! I don't have pictures, but next step is just
sanding it like crazy! Until you are satisfied with how smooth it is.
My next Etwahl making post will be about the swirly designs and spray
painting!

Sona Progress: Designing and Painting (Etwahl - Part 3)
After you have sanded it as smooth as you can, you
are ready to add the designs on the instrument. I am using craft foam
to give it that 3D design. I drew the designs in pencil, free-hand,
directly on the plaster. It was a pretty great canvas to work on. To
copy over the design, I traced it on tracing paper. I only have to do
one side, and then mirror the other side.
Using the tracing paper stencils, I drew and cut it out of foam. Small
detail, but for the center pieces I gave it a 3D look by overlapping the
music note (as you can see in the yellow and black)
I used a glue gun to attach all the foam designs to the instrument. This is the end result:
Same idea goes for the wings. Draw out the design, make the stencils, and cut it out of foam.
Use a glue gun to attach the foam.
Next, you need to prime the plaster and foam for the next step (spray painting). I used Mod Podge.
All done sealing the instrument!
And here is the instrument after adding 2 layers of Rustoleum Gold Spray
paint. Can be found at Walmart for about $4. I had just enough with 1
can for the entire costume, without giving a second layer on the bottom
side.
Sona Progress: Finishing Touches (Etwahl - Part 4)
So here's the last post of my Sona series! The
costume is pretty much done, but here are some details that enhance it
some more. Its hard to tell in pictures, but below is a picture of my
instrument after it was spray painted On the right side, I started
weathering it. I didn't take any pictures, but basically I used brown
paint, water, and an old piece of cloth and jus rubbed every crevice. I
also used a dry brush with the paint, focusing on all the corners. It
helps bring out the details and make the prop look more worn and antique
like. To add to it more, I bought rub and buff in gold leaf. Squeezed
a little out of the tube and rubbed with my hands and then with the
cloth to buff it.
With both sides weathered.
Here's a great before and after picture. What a difference it makes!
To finish it off, I am using sky blue EL wire I bought from Ebay to make the strings.
I used a leather hold punch to make small holes to string the light
through (also used foam pieces in hidden areas to keep the string in
place and not be limp).
Here is the finished product! The biggest and most time consuming prop
I've made so far. I had my doubts and worries, but it came out great
and I'm really happy with it. I made a lot of quick videos which I will
one day make a compilation. Check for it on my Youtube channel.
Thanks so much for reading and following my Sona progress! Hope you
enjoyed it and learned something too from my attempts to make cosplay :3
Next League of Legends cosplay is Frost Queen Janna!
Sona Progress: Long Blue Gown
The long blue gown was the first thing I started in
this costume, and i recently finished the top of it.
I found a semi-shiny royal blue color fabric that was on sale, $4 a
yard, and bought 5 yards. Decided to make a 3/4 circle skirt, since a
full circle would make a really full skirt and I don't want it that big.
The width of the fabric is 45" (JUST enough for it to reach the ground
for me. I'm 5'3. So adjust accordingly how long you want it). I
folded the fabric 3x at 45" and cut off the excess. This used 3.75 yards
of fabric. Using a piece of string that is 45" inches long, tape it
down at the bottom left corner. Move the string from the top left to
the bottom right, marking it with chalk as you go. Cut along this
dotted line marking. Open up the fabric and connect the 2 ends and sew!


I'm not a great seamstress, everything is just self taught and guessing
around. For the top, I simply cut out a piece of fabric and wrapped it
around my body (oh how I wish I had a mannequin!) and pinned where I
needed to add darts to make it more form fitting. I had to re-do this
about 4 times before it was the way I liked it. I then connected the
top to the bottom. For the back closure, I am just using velcro since
it is a costume and will be hidden. I'll update on some more Etwahl
progress next!
Sona Progress: Outer Light Blue Robe
I have been on vacation and currently prepping for
Animenext so I haven't been able to update on time every week. Here's
the next post in my series of Sona progress!
I started making the outer light blue robe by drafting a pattern out of scrap paper.
I cut out the patterns and sewed! I made double of everything to make 2
layers since my fabric is thin and I also wanted to add interfacing in
between to make it stiffer.
I initially added 1 layer of interfacing. After I finished the costume,
I wish I had added more! Because I added a really thick wire to hold
up my robe, it would have been sturdier if the light blue fabric had
more interfacing.
I made the bell sleeves as 2 pieces with elastic band.
I started sewing the gold strips on all the edges. I sewed on one side.
Later on, to close it, I will put in the wire, and then fold over it,
sew the wire in place, and hand sew to close it.
I decided to add wire to give the illusion I am floating like the
character Sona. The wire I got was really thick, which is a good and
bad thing. It held up my costume really well and everything stayed in
place. But if it wasn't so thick, I would have had an easier time
transporting it, and it wouldn't be as hard to sew in. The light blue
parts wouldn't look so floppy either. If i had added more interfacing
it would have looked been better. It's a learning process :/
Sona Progress: Applying Gold Designs and Hairpieces Tutorial
Sorry it's been a while since I posted! Been busy
with life. Almost done with my Sona series! This one will be about how
I applied the gold music note designs and also how I made the
hairpieces for her ponytails.
I used Heat n Bond (bought from Joann's). I drew the music notes
freehand, making each one as accurately sized as I can. I didn't want
to be lazy and use the same size for all the notes on her dress. I
traced the pattern on the flat paper side of the HnB sheet and roughly
cut it out.
I laid the note on the wrong side of my fabric and ironed on the HnB
sheet (with the bumpy side on the fabric). I just placed the iron on
for about 8 seconds and it adhered.
I cut the note out of the fabric.
Peel the HnB off the back of the fabric, like a sticker.
Space out all your notes in their respective spots. Put the iron on the
note for a few seconds. See if it is bonded, if not, iron for a few
more seconds.
I really like how the designs came out for the back. The backside of costumes are always under-appreciated ;)
I also added the gold notes that are on the backside of the blue gown.
Headpieces
I used thick foam from Michael's craft store. I made it in 3 layers.
Basically a center piece that is in this shape below, and sandwiched it
with 2 window pieces (hollowed out the middle with an exacto knife).
Hot glue the 3 layers together.
I used regular craft foam (thin) for the brown parts. Don't hot glue it
yet. The white parts will be spray painted in gold, the thicker foam
allows it to still give an elevated edge to them.
It was really hard o see the gold note designs from the 3D model, I tried the best I could.
Ps: I made some parts of the layers in 2-4 pieces because I had scrap pieces left. Hence the white and black combo on the left
To make 3 layers appear like its one, I used some old drydex I found.
It could have been better if I had a new container, but it got the job
done.
Also, to make the hairpieces have a curved shaped, I held them in an
oven to heat it up just a little and slowly bent and molded it to the
shape I wanted. Repeat the heating if it cools down before it is done.
All smoothed out with spackling.
Used gesso to prime the surface for spray painting.
Spray painted the rims and music notes.
Time to hot glue the brown foam.
Hot glue the gold pieces. Use modge podge or something to seal if you'd like.
That is it. The holes are there for the pigtail clip to go through and attach to your short wig.
 |
| Soul Drive Photography |
Sona Progress: Wig Styling
For the wig, I am using my old Hatsune Miku Append wig I bought from
eBay ($40). Any Miku wig would work for Sona. This append wig is a
lighter turquoise than most, with a mix of white hairs, which I think
suits Sona. The hard thing about using a Miku wig is that you won't
have the yellow ends like Sona. If you decided to buy a white wig from
scratch, you can dye it blue and gradient to yellow. This tutorial is
to show how to apply the yellow tips for an already turquoise wig. I
bought a pack of 10 yellow extensions from eBay ($8~). They were pretty
thin and super bright yellow. Honestly, I didn't know what I was
doing, and wasn't expecting it to look that great. But it turned out
better than I thought, and blended pretty well without being too
noticeable.
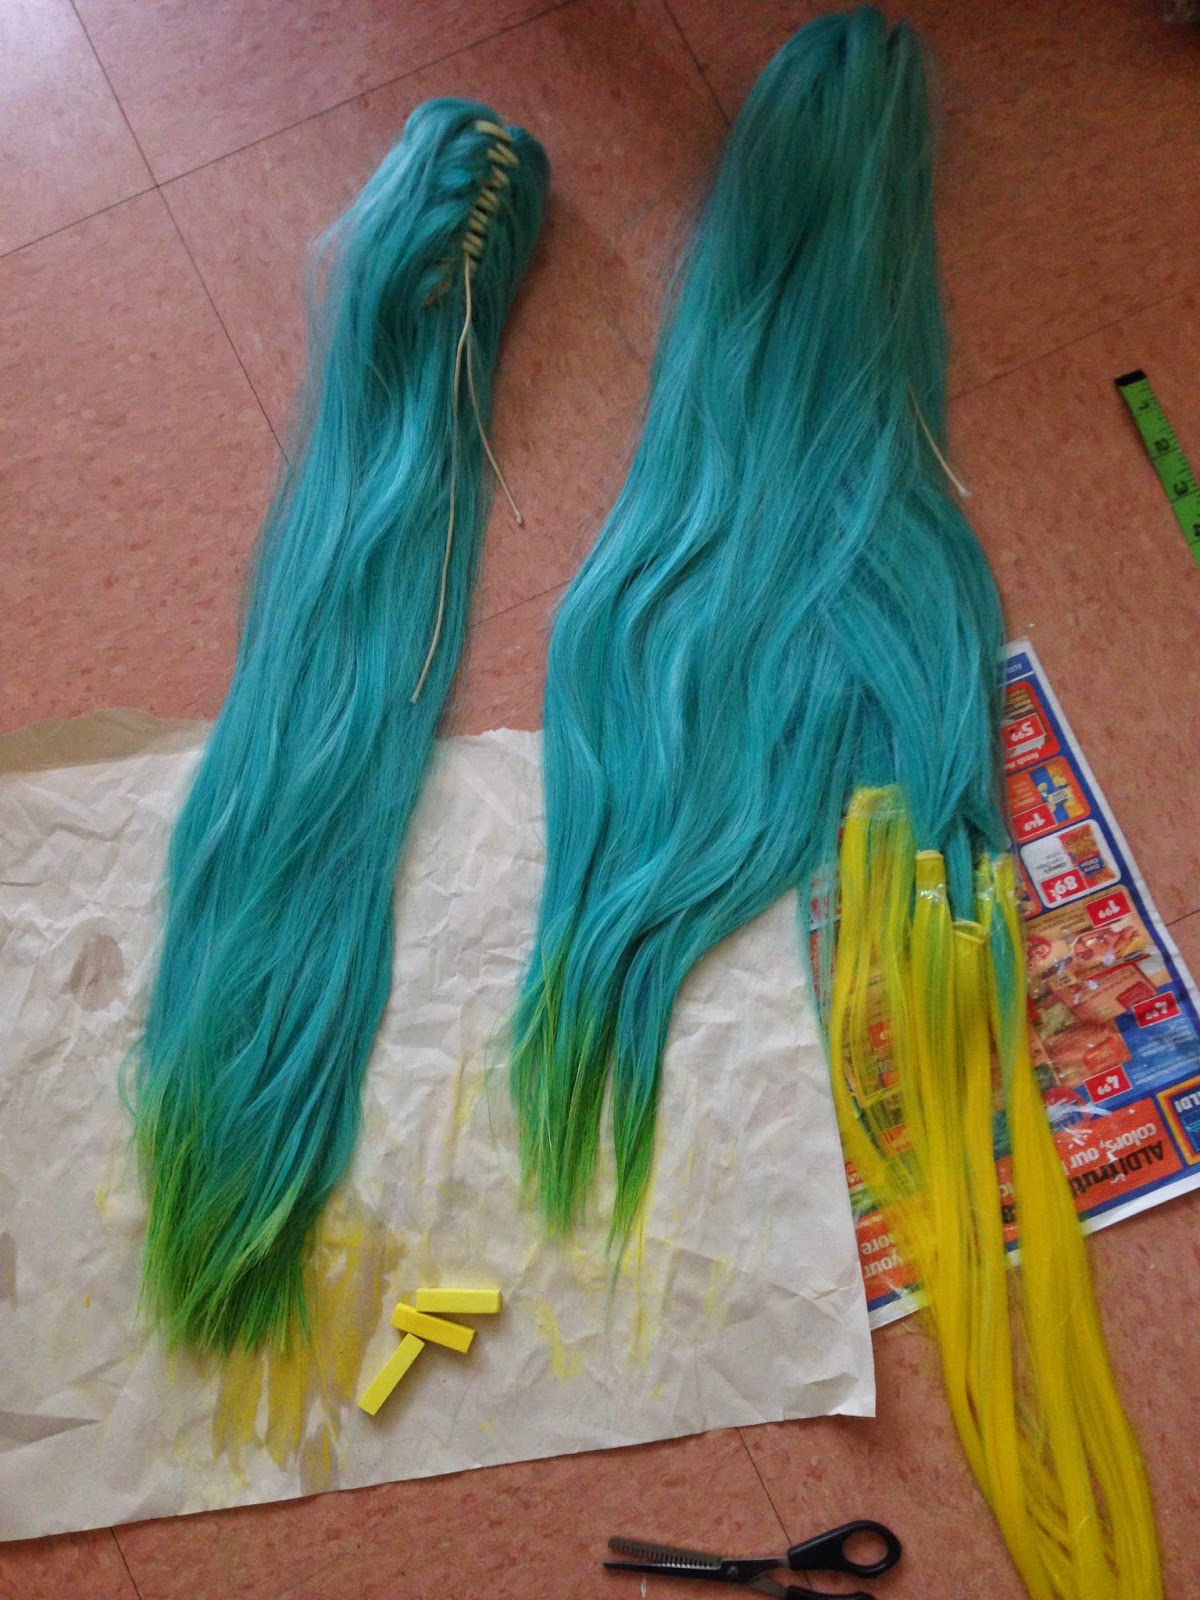
This is what I had to work with.
I cut off about 19 inches off the 40 inch pigtail. I'm crying on the inside.
Had to learn how to make wefts. There are many tutorials online. I
made mine kind of sloppy but I didn't care, it'll all be hidden. I got a
strip of sheer fabric, and spread the hairs on it and sewed. I kept
repeating this process until all the hair was layered and firmly
attached on the strip.
This is after several layers until all the hair was sewn down.
I used hot glue for extra security.
Time to add the yellow extensions. I removed the extension clips.
I separated 5 strands of the weft out (towards the inside middle), and used hot glue to wrap around the yellow extension.
Here all 5 yellow extensions have been attached.
Now back to the upper pigtail clip. I wanted the blue wig to look like
it naturally blended in with the yellow. I will be using "hair chalk"
method. I bought a pack of soft pastels to dye the blue wig into
yellow. If you don't want to use extensions, I think this method could
have worked too, the yellow just won't be as vibrant. I was also afraid
it would look a bit green (mixing blue with yellow). Just pack on more
color if it does.
I wet the hair first. And worked in strands. Rubbing the chalk in a downward motion on the blue ends.
There is no specific procedure. I colored 1 pigtail after the
weft+extension was attached already. And worked on my second pigtail
(before weft+extension was applied)
Attach the weft by rolling it up and using thread and weave in and out
of the hair clip attachment at the top. The weft will be hidden in the
middle. Use the upper pigtail hair to cover around the weft.
I forgot to mention, you should layer the upper pigtail ends (can do
this before and/or after adding weft). The layers will allow it to
blend into the yellow better and not look to thick and abrupt change.
Trim until it looks perfect :)
Here is the completed wig. It would have been nicer with more yellow
extensions for a fuller look but I am pretty satisfied with the outcome
with what I had to work with. My instrument also lands right around
where the color blends, so the wig color change is not even that
noticeable in pictures.
aqui os outro trabalhos da moça:
http://mycutebow.blogspot.com.br/
|